Required section · Section 2 of 6
Air cushion versus direct contact
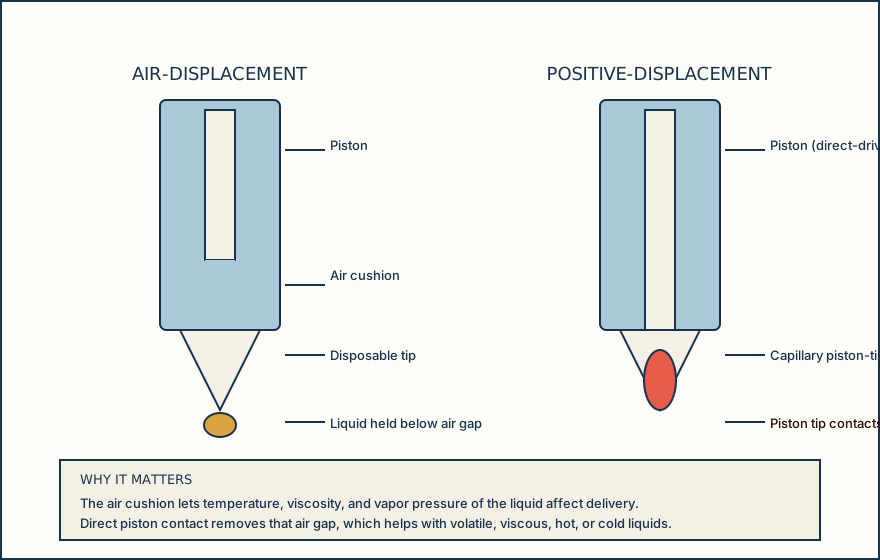
Most laboratory pipettes are air-displacement pipettes. A moving piston inside the pipette body compresses a fixed cushion of air, and that air cushion pushes the liquid into and out of a disposable tip. Because there is a layer of air between the piston and the liquid, anything that changes the air, or the liquid's behavior in that air, can change how much liquid actually moves. Liquid temperature, viscosity, and vapor pressure can all affect delivery through this air cushion.
A positive-displacement pipette removes that air cushion. The piston sits inside a capillary that is itself the tip, so the piston contacts the liquid directly. This construction is useful for liquids that make air-displacement delivery less dependable: volatile liquids that evaporate into the air gap, viscous or foaming liquids, and liquids that are notably hot or cold. Positive-displacement is a selection alternative for those situations, not a universal replacement for air-displacement pipettes.
Whichever type is in hand, the pipette, its tip, the liquid, and the test environment function as one system when you assess delivery performance. A pipette that performs well with water at room temperature is not automatically proven to perform the same way with a viscous reagent, a volatile solvent, or a different tip lot. Select the pipette whose usable range includes your target volume, then choose the smallest suitable range for that volume, because low-volume delivery carries proportionally greater error than delivery near the top of a pipette's range.
The diagram below sets the two constructions side by side. Notice where the liquid actually meets a moving part in each design; that single difference explains most of the practical guidance that follows.
Before you touch the plunger, confirm the pipette type and volume range match the liquid and the target volume in front of you.
Illustrative drawing — this picture was drawn rather than captured.
One forward-pipetting aspirate-and-dispense cycle for an air-displacement pipette.
Prewet the tip
Aspirate and dispense the target liquid two or three times with a fresh tip before the measured transfer. Prewetting conditions the tip surface and the air cushion, and matters most for volatile liquids; its exact effect depends on the liquid, tip, operator, and workflow, so it is not a universal correction.
Aspirate vertically at a consistent depth
Hold the pipette vertical and use the immersion depth specified by the current pipette/manufacturer procedure for the liquid and container. Too shallow can draw air into the tip; too deep or inconsistent immersion can change the volume drawn and leave liquid on the outside of the tip.
Release the plunger slowly and pause
Let the plunger return slowly rather than snapping up, then hold a brief, consistent pause before withdrawing the tip from the liquid. The pause lets the aspirated liquid column stabilize before it moves.
Dispense to the vessel wall
Touch the tip to the receiving-vessel wall at an angle and dispense there rather than into free air, then follow the blow-out sequence specified for that exact pipette model to expel the last measured volume.
Knowledge checks
Reading and checks are open. Sign in only to save.
Knowledge check 1
Knowledge check 2
Section status
Finish this section
Reading and checks are open. Sign in only to save.
The module finishes after every required section is marked done and every check in those sections is correct.